For a quick one-off check, use a browser-based diff tool that processes images locally in your browser. For private, batch, or legally sensitive work, use a local desktop app. For repeatable automated checks, use a CLI script or API.
- Fast in-browser check: Drag two images into a browser tool, pick a mode (side-by-side, slider, or pixel diff), and read the results in seconds. No install needed, and tools like OptiPix process everything on your device with no upload.
- Local/desktop app: Open images in a Windows app, normalize dimensions, run a heatmap or blink comparison, and export a diff report. Best for sensitive files, batch jobs, or when you need an audit trail.
- Automated/CI tools or APIs: Feed image pairs to a script or API endpoint. Best for visual regression pipelines, QA teams, or any workflow with more than a handful of image pairs.
Key Takeaways
The most reliable way to compare images is to combine a pixel-diff heatmap for objective scope, blink mode for perceptual relevance, and split-wipe for focused inspection, all processed locally when privacy matters.
| Point | Details |
|---|---|
| Choose the right route | Use a browser tool for quick one-off checks, a local desktop app for private or batch work, and an API for automated pipelines. |
| Combine comparison modes | Run diff first, then blink, then split-wipe; no single mode catches every type of difference reliably. |
| Prepare images before comparing | Match dimensions, apply EXIF orientation, and export lossless PNG when pixel-level precision matters. |
| Privacy requires local processing | Browser tools that use WebAssembly or Canvas with no upload keep files on your device; local desktop apps offer the strongest guarantee. |
| Lawtonpdf for professional workflows | Lawtonpdf's Windows app compares images and documents locally, with exportable diff reports and batch folder comparison. |
Table of Contents
- How do you compare two images right now?
- What do the different comparison modes actually show?
- How do you choose the right image comparison tool?
- Which file formats work, and how should you prepare your images?
- What are the most common use cases for image comparison?
- Why a single comparison mode is almost never enough
- Lawtonpdf handles private and batch image comparison on Windows
- Sources
- FAQ
How do you compare two images right now?
You have three practical routes. Each takes under two minutes to start.
Browser method
- Open a browser-based tool such as Ezgif's compare page or Compix Pixel Diff.
- Upload or drag both images into the tool.
- Select a comparison mode: side-by-side, slider overlay, or highlight differences without relying on specific percent-difference values.
- If the images have different dimensions, use a tool that normalizes them onto a shared canvas rather than stretching one to fit.
- Read the pixel count output. Export the diff image if you need a record.
Privacy note: Tools that use WebAssembly or Canvas processing keep your files on your device. No data leaves your browser.
Local/desktop method
- Open your desktop image comparison app (Windows).
- Load both images. If dimensions differ, use the apps normalize or align function.
- Run a heatmap or pixel-diff pass first to locate changed regions.
- Switch to blink or split-wipe mode to confirm what you see visually.
- Export the diff PNG and any statistics report for your records.
Lawtonpdf's image compare tool handles this workflow locally on Windows, with no cloud processing involved.
CLI or API method
- Choose a tool with a public API, such as Cloudinary's image comparison API.
- Write a short script that feeds image pairs to the endpoint and captures the diff output.
- Store results (diff images, pixel counts, pass/fail flags) in your pipeline's artifact store.
- Set a pixel-difference threshold that triggers a failure alert.
Use this route when you have many image pairs, a CI/CD pipeline, or a team that needs consistent, repeatable results.
Pro Tip: Before any comparison, check that both images share the same resolution and color profile. A mismatched DPI or an sRGB-vs-Adobe-RGB mismatch will generate false positives across the entire image.
Common gotchas checklist:
- Dimensions do not match (causes canvas offset errors)
- Different color profiles (sRGB vs. Adobe RGB)
- EXIF rotation not applied (image appears rotated in the diff)
- Compression artifacts from re-saving a JPEG (adds noise to the diff)
- Animated GIF frames not extracted before comparison
What do the different comparison modes actually show?
Picking the wrong mode is the most common reason a comparison misses real differences. Here is what each mode does and when to reach for it.
Side-by-side and slider (peel): You see both images at once, or you drag a divider to reveal one beneath the other. Fast and perceptual. Good for layout checks, color changes, and anything a human eye can catch quickly. Not reliable for small or subtle pixel-level changes.
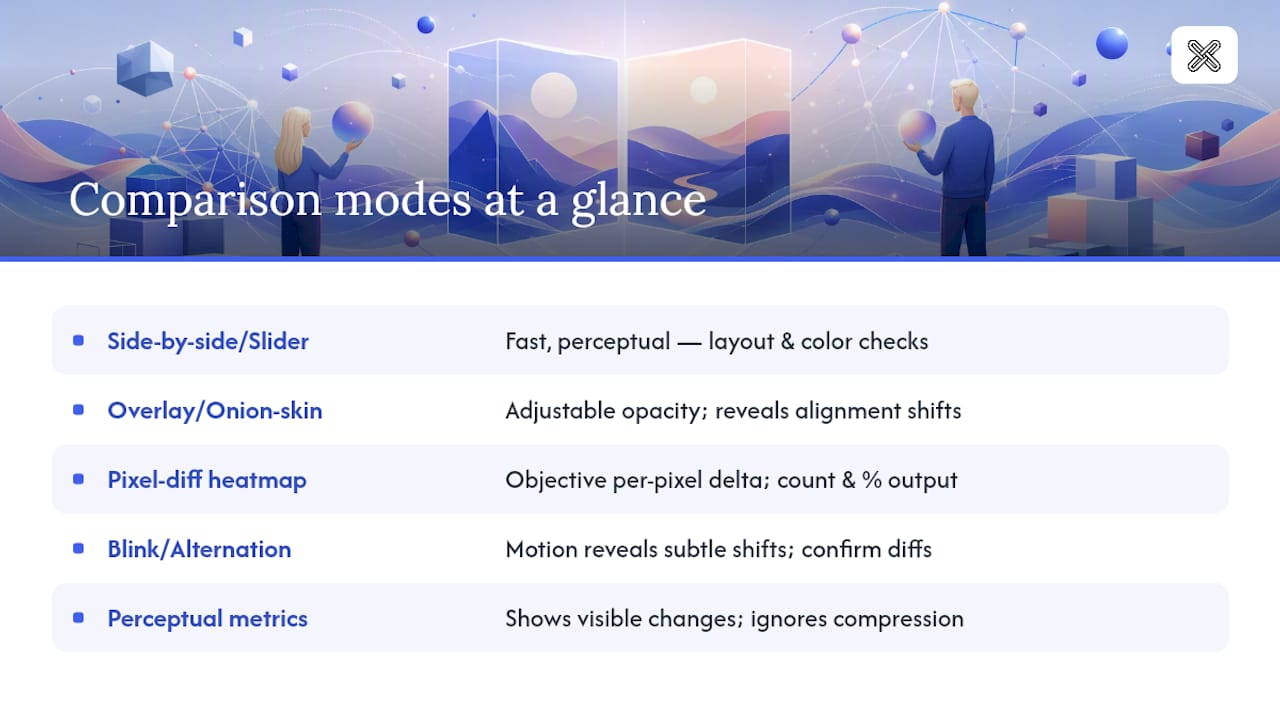
Overlay and onion-skin: One image sits on top of the other at adjustable opacity. Useful when you suspect small alignment shifts.
Pixel-diff heatmap: This is the objective mode. The tool reads per-pixel RGBA values from both images using getImageData(), computes the delta for each channel, and maps those deltas into a colored overlay. Compix Pixel Diff explains this computation clearly: red or bright pixels in the heatmap mark where the two images diverge. The output includes a changed-pixel count and a percent-difference figure, giving you a verifiable, numeric record of what changed.
Blink/alternation: The tool flips rapidly between the two images. Human vision is highly sensitive to motion, so even a one-pixel shift or a subtle tonal change becomes visible as a flicker. Use blink after a pixel-diff pass to confirm whether a flagged region is visually meaningful or just a compression artifact.
Perceptual and structural metrics (FLIP-like): These metrics weight differences by how noticeable they are to a human observer, rather than treating every pixel equally. A raw pixel diff might flag heavy JPEG compression as a large change even when the images look identical to the eye. Perceptual metrics correct for that. Use them when you need to separate "technically different" from "visibly different."
Combining modes matters. Visual regression practitioners note that no single comparison mode detects all difference types reliably. A pixel-diff heatmap locates changes objectively; blink confirms perceptual relevance; split-wipe lets you inspect a specific region in detail. Running all three takes under 90 seconds and catches what any single mode would miss.
Pro Tip: Run the sequence in this order: diff first (scope), blink second (perceptual relevance), split-wipe third (focused inspection). This sequence, recommended by Compix, gives you both objective data and human-readable confirmation in one pass.
How do you choose the right image comparison tool?
Match the tool type to your actual need. Here are the criteria that matter most.
Decision criteria:
- Privacy and local processing: Does the tool process images on your device, or does it upload them to a server? For sensitive files, local-only is non-negotiable.
- Supported formats: Does it handle your file types (JPG, PNG, WebP, HEIC, TIFF, GIF)?
- Comparison modes: Does it offer pixel diff, blink, slider, and overlay, or only one or two?
- Batch or single-pair: Do you need to compare one pair at a time, or dozens of files in a folder?
- Output and reporting: Can you export a diff image, a pixel-count report, or a pass/fail log?
- Cost and licensing: Free browser tools cover most one-off needs; professional or team workflows usually need a paid license.
- Platform: Web, Windows desktop, or cross-platform CLI?
Matching needs to tool types:
- Designer verifying a color change before publishing: browser slider or blink mode, no install needed.
- Legal team comparing evidence images: local desktop app with exportable diff and metadata, no cloud upload.
- QA engineer running visual regression on a web app: API or CLI tool integrated into a CI pipeline, such as Cloudinary's comparison API.
- Archivist comparing scanned manuscript pages: open-source local tool with geometric alignment, such as VGG Image Compare.
- Developer checking a batch of product photos: folder-level comparison in a local desktop app.
Pro Tip: If you are unsure whether a browser tool uploads your files, check the network tab in your browser's developer tools while running a comparison. A tool that makes no outbound requests after the page loads is processing locally.
For privacy-focused or professional workflows, Lawtonpdf's image compare tool runs entirely on your Windows machine, supports batch and folder comparison, and produces exportable reports.
Which file formats work, and how should you prepare your images?
Most browser and desktop tools support the common formats, but preparation matters more than format choice.
Commonly supported formats: JPG/JPEG, PNG, WebP, GIF (single frame only), BMP, TIFF, HEIC. Animated GIFs and video frames require extraction before comparison; tools compare still images, not sequences.
Common pitfalls:
- Mismatched dimensions cause pixel-offset errors. A tool that normalizes images onto a shared RGBA canvas, as PixelPeel does, handles this correctly without stretching.
- Different color profiles (sRGB vs. Adobe RGB) produce false positives across the whole image.
- JPEG compression artifacts add noise to the diff, especially after re-saving.
- EXIF rotation metadata can cause one image to appear rotated relative to the other.
- Transparency in PNG files needs consistent handling; some tools flatten transparency to white, others to black.
- PDF-embedded images must be exported as standalone image files before comparison, or handled through a document-image comparison workflow.
Preparation steps:
- Export both images at the same resolution and dimensions.
- Use lossless format (PNG) when pixel-level precision matters.
- Strip or apply EXIF orientation before loading into the tool.
- Extract individual frames from animated GIFs or video before comparing.
- Convert HEIC to PNG or JPEG if your tool does not natively support HEIC.
- For PDFs, export the relevant page as a high-resolution PNG first.
What are the most common use cases for image comparison?
Different jobs call for different modes and tool routes. Here is how to match them.
Design and web QA: Run a browser pixel-diff for a single before/after check. For a full web app, plug a visual regression API into your CI pipeline so every deployment is checked automatically. Flag any diff above your agreed pixel-difference threshold.
Art restoration and archival collation: Align scans using geometric transforms (affine or thin-plate spline), then toggle or onion-skin to spot retouching. VGG Image Compare supports these alignment modes and is used in scholarly collation and restoration projects. Use a local tool for original high-resolution scans to avoid any upload risk.
Satellite and historical image change detection: Geometric alignment is the first step, because images from different dates or sensors rarely share the same coordinate space. After alignment, a diff heatmap highlights changed regions clearly, whether that is new construction, deforestation, or flood extent.
Spot-the-difference and photo edits: Slider or blink mode is fastest for perceptual checks. Run a pixel diff afterward to confirm every flagged region and catch any changes the eye missed.
Legal and evidentiary use: Process images locally, export the diff image and pixel-count statistics, and keep a record of the tool version and settings used. Local processing removes the chain-of-custody risk that comes with uploading files to a third-party server. For legal workflows, consult qualified counsel on evidentiary standards before relying on any comparison output.
Pro Tip: For archival or legal work, save both the original images and the diff output together in a single folder with a timestamp. That package is your audit trail if the comparison is ever questioned.
Why a single comparison mode is almost never enough
Relying on one mode is the most common mistake in image verification work. A pixel-diff heatmap tells you where pixels differ and by how much, but it cannot tell you whether those differences are visible to a human. Blink mode tells you whether something looks different, but it cannot give you a count or a location. Split-wipe lets you inspect a region closely, but you have to know where to look first.
The three-step sequence solves this:
- Objective diff for scope. Run the pixel-diff heatmap first. Note the changed-pixel count and percentage. This tells you the scale of the difference and where it is concentrated.
- Blink for perceptual relevance. Switch to blink mode and watch the flagged regions. If the flicker is obvious, the difference is visually significant. If it is barely noticeable, it may be a compression artifact rather than a real change.
- Split-wipe for focused inspection. Drag the divider over the specific regions the diff flagged. This gives you the clearest side-by-side view of exactly what changed.
When exact counts matter, record the pixel-diff statistics and save the diff PNG alongside your source files. That record is your audit trail.
Lawtonpdf handles private and batch image comparison on Windows
When your images are sensitive, or when you have a folder full of pairs to check, a browser tool is not the right fit. Lawtonpdf runs entirely on your Windows machine. Nothing is uploaded. Every comparison, every diff report, and every exported image stays on your device.
The image compare feature supports pixel-level diff, multiple inspection modes, and exportable reports you can attach to an audit or legal file. The folder compare tool handles batch jobs across entire directories. For workflows that mix images with PDFs or documents, the full LawtonPDF tools suite covers PDF comparison, text comparison, and spreadsheet comparison in the same local environment.
Legal teams, auditors, and anyone handling private evidence will find the local-first model the right fit. Download Lawtonpdf and run your first comparison at Lawtonpdf.
Sources
- Pixel Diff — See Exactly Which Pixels Changed (Free, In Your Browser)
- Image Compare
- Optipix
- KanadeK/pixelpeel
- Compare Two Images Online
FAQ
How can I compare two images quickly?
Upload both images to a browser-based tool like Ezgif or Compix, select a comparison mode (side-by-side, slider, or pixel diff), and read the changed-pixel count in the output. No install is required, and tools that use Canvas processing keep your files on your device.
What free app lets me compare pictures locally without uploading?
Lawtonpdf offers a free Windows app that compares images entirely on your device. Browser-based tools like OptiPix also process images locally via Canvas with no upload, making them a solid free option for quick checks.
Can I compare images on an iPhone?
Most browser-based comparison tools work in Safari on iOS. Open the tool's URL, upload or share your two photos, and run the comparison directly in the browser. Dedicated iOS apps for pixel-level diff are limited, so a browser tool is the most practical route on iPhone.
How do I find differences between two images automatically?
Use a tool with an API or CLI support, such as Cloudinary's image comparison API. Write a short script that feeds image pairs to the endpoint, sets a pixel-difference threshold, and captures the diff output. This approach scales to hundreds of image pairs and fits into CI/CD pipelines for visual regression testing.